
You can create your own Shopify AMP page. This allows you to test AMP on an actual Shopify store, and see what is and isn't possible.
When we render your pages, it's not the same exact process that Shopify performs, but it is similar.
You will be creating a new "Layout" file, and a new "Template" file. Both are required. Once you've created both, we can use them to display an AMP page directly from your Shopify store, and you have full control over the code.
Note that this tutorial creates the most basic, BLANK page. The reason AMP by Shop Sheriff is useful is because it abstracts all of this confusion away, and gives you an app to manage settings easily. This tutorial, on the other hand, does not use any app, and creates an absolutely blank page, which you can then style and edit using your normal liquid structure.
This tutorial assumes you are familiar with AMP format.
If you'd like to play around with AMP outside of Shopify, we invite you to try the AMP playground, where you can code in an AMP sandbox environment.
Option 1 - Create an AMP "Pages" template on Shopify
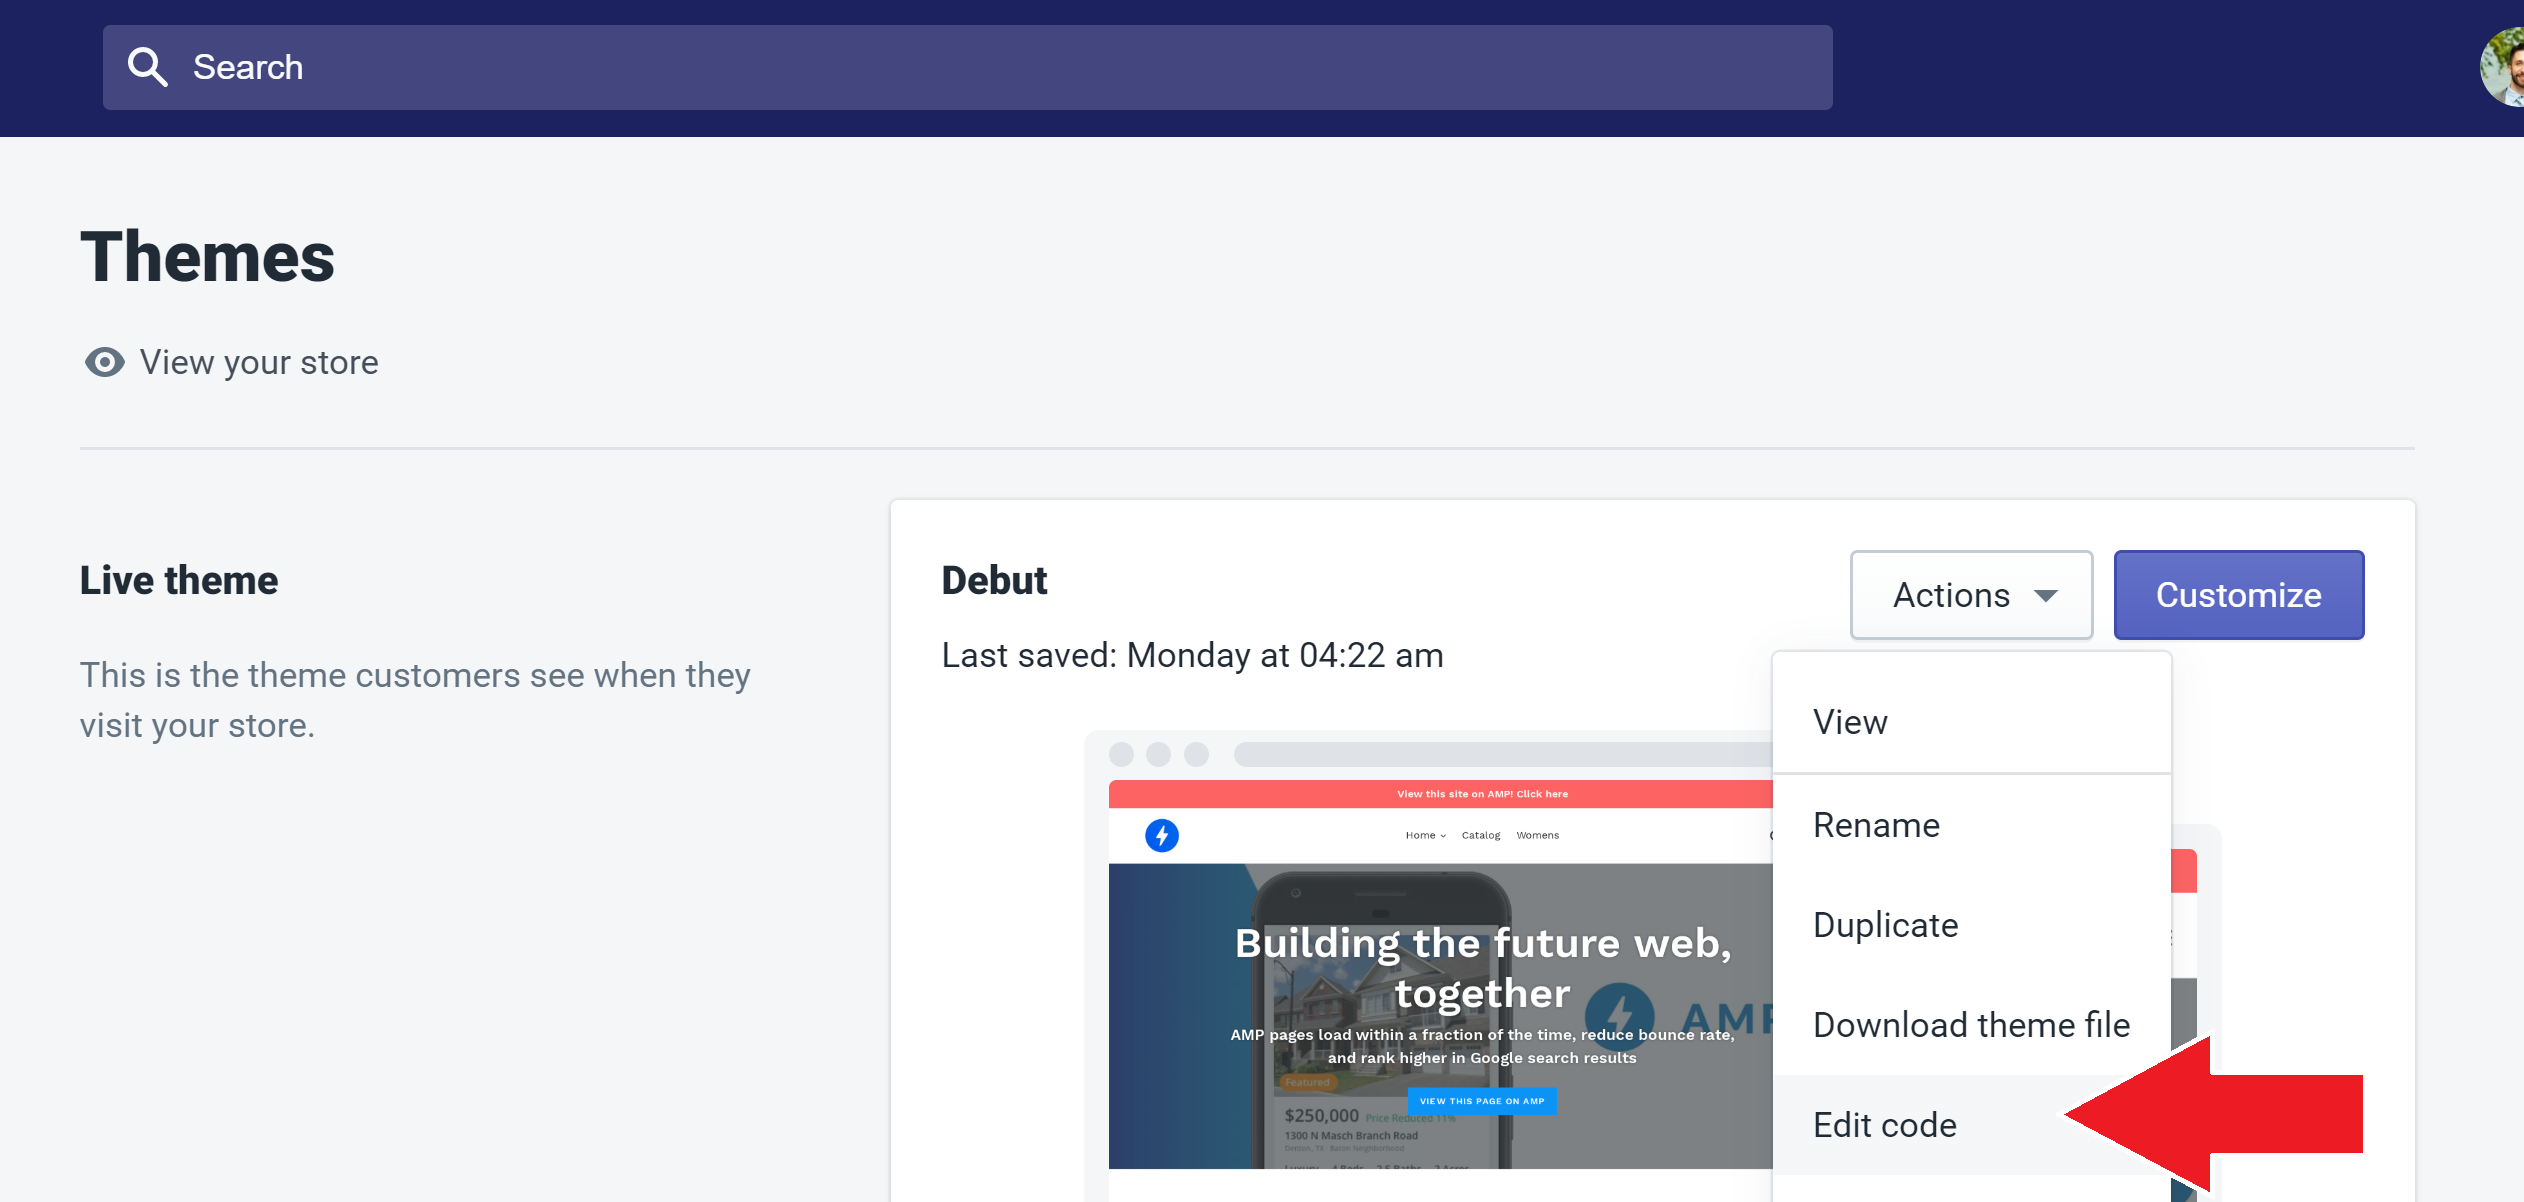
- Open your Shopify Themes panel.
- Click "Actions > Edit code".

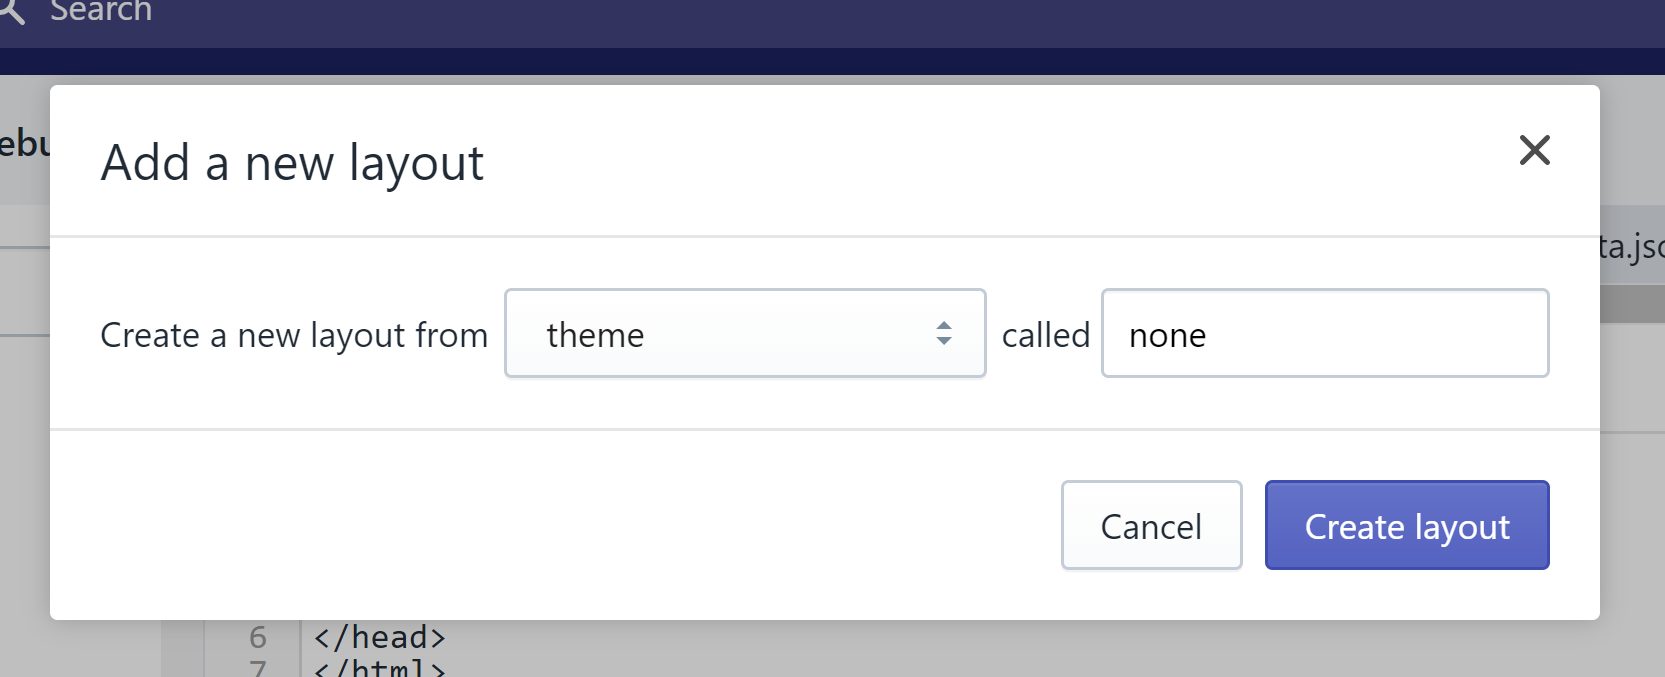
- Select "add a new layout".
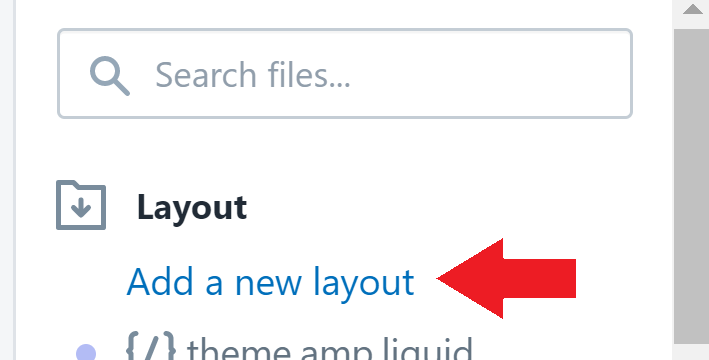
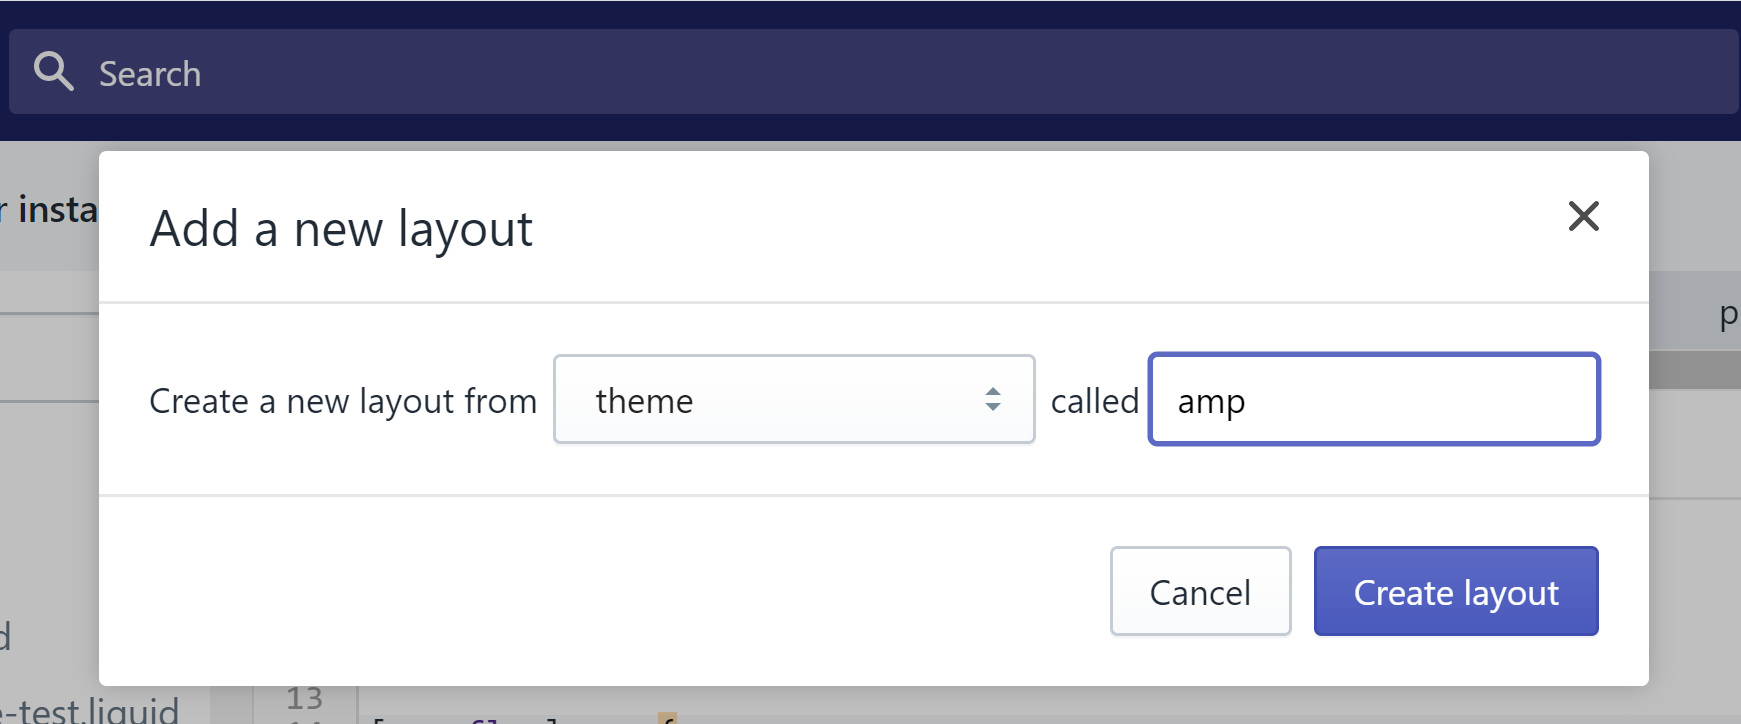
- Create a layout for: theme called: none.
- Delete the entire boilerplate code in that new file.
- Enter this code and click "Save".
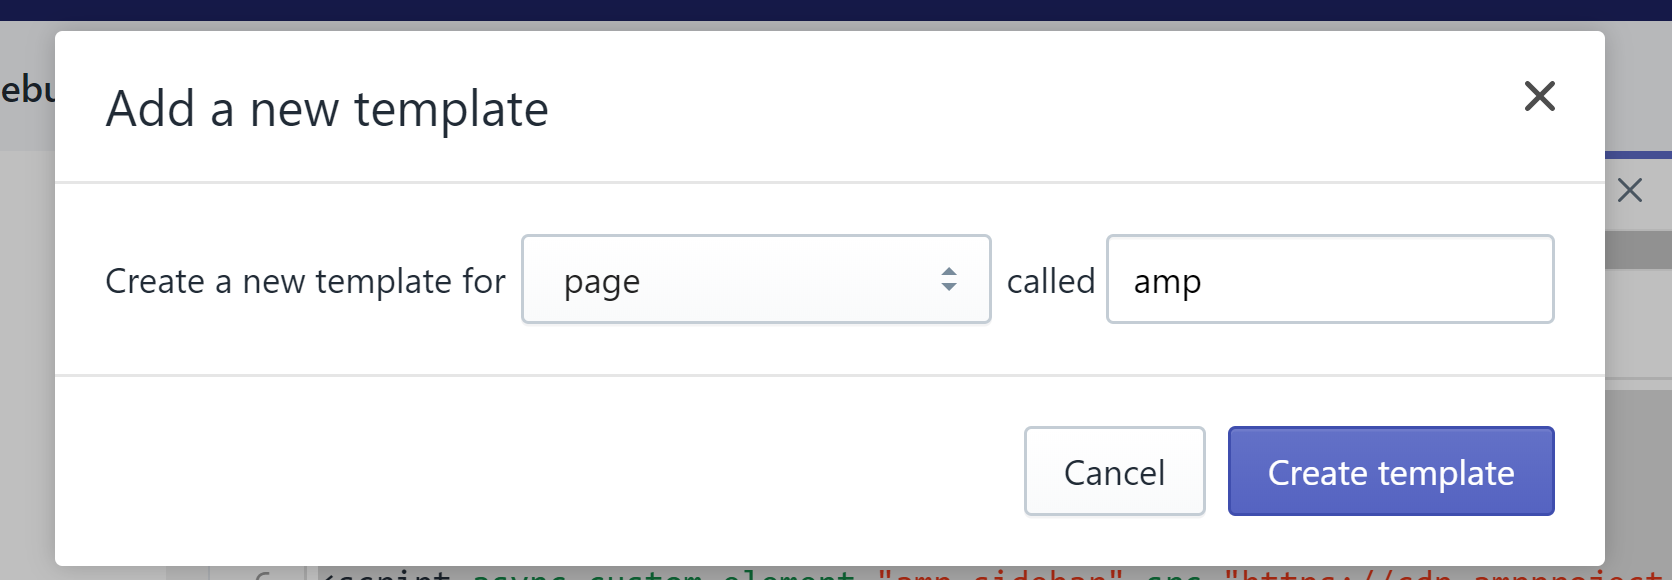
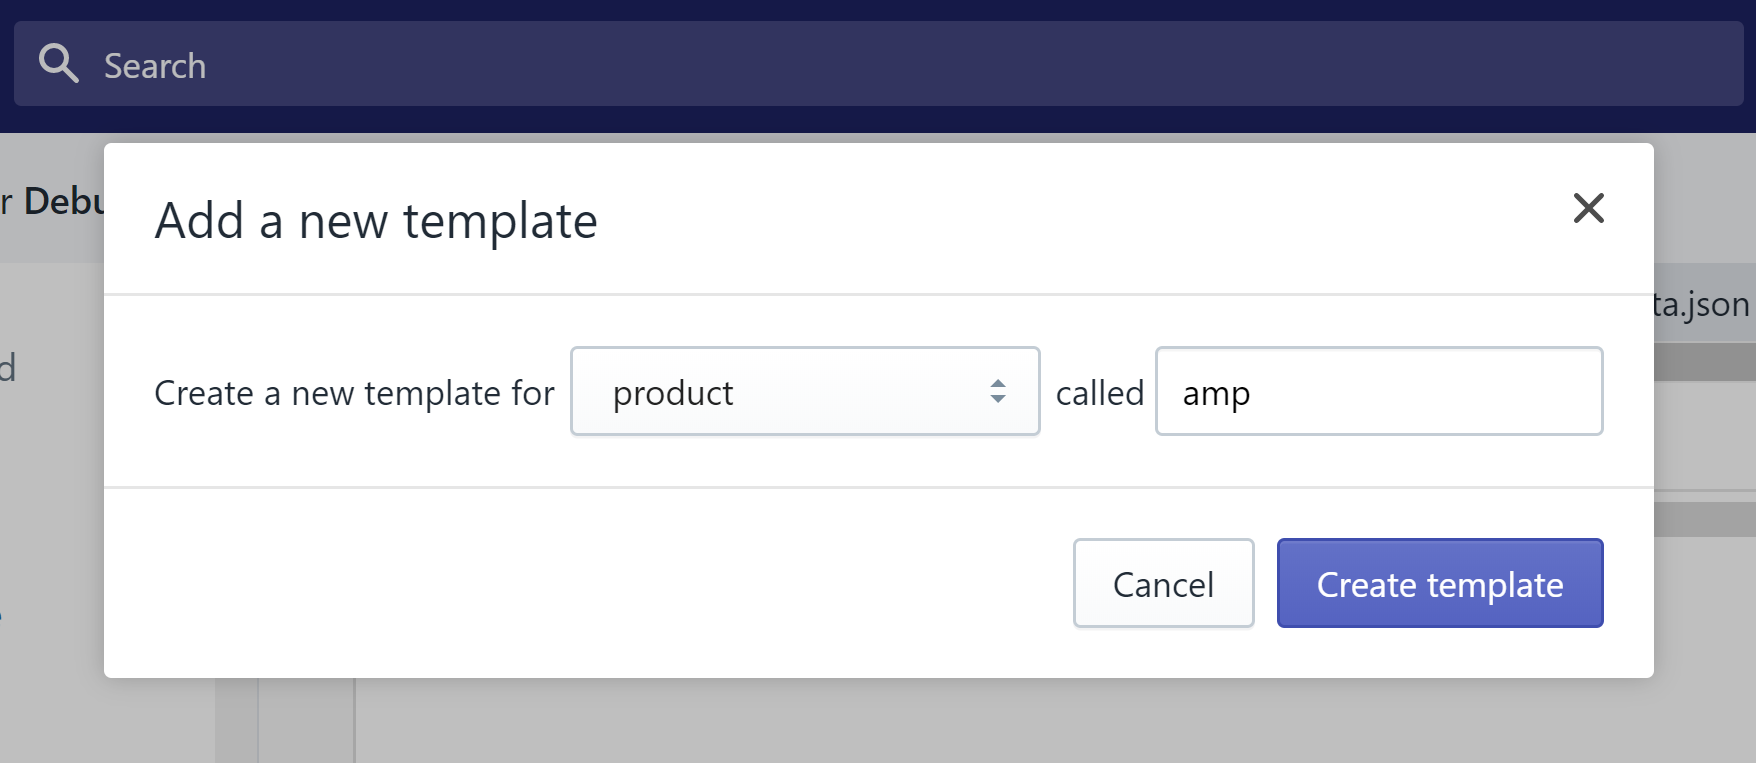
{% comment %} <!doctype html> <html class="no-js" lang="{{ shop.locale }}"> <head> {{ content_for_header }} </head> </html> {% endcomment %} {{content_for_layout}} - Create a new template for: page called: amp.
- Save this code. This is your entire AMP page code, using HTML and liquid.
{% layout 'theme.none' %}
<!doctype html>
<html amp lang="{{ shop.locale }}">
<head>
  <script async src="https://cdn.ampproject.org/v0.js"></script>
<script async custom-element="amp-sidebar" src="https://cdn.ampproject.org/v0/amp-sidebar-0.1.js"></script>
<script async custom-element="amp-form" src="https://cdn.ampproject.org/v0/amp-form-0.1.js"></script>
<script async custom-element="amp-analytics" src="https://cdn.ampproject.org/v0/amp-analytics-0.1.js"></script>
  <script async custom-element="amp-selector" src="https://cdn.ampproject.org/v0/amp-selector-0.1.js"></script>
  <script async custom-element="amp-list" src="https://cdn.ampproject.org/v0/amp-list-0.1.js"></script>
  <script async custom-element="amp-bind" src="https://cdn.ampproject.org/v0/amp-bind-0.1.js"></script>
<!-- Import other AMP Extensions here -->
<style amp-custom>
/* Add your styles here */
</style>
<style amp-boilerplate>body{-webkit-animation:-amp-start 8s steps(1,end) 0s 1 normal both;-moz-animation:-amp-start 8s steps(1,end) 0s 1 normal both;-ms-animation:-amp-start 8s steps(1,end) 0s 1 normal both;animation:-amp-start 8s steps(1,end) 0s 1 normal both}@-webkit-keyframes -amp-start{from{visibility:hidden}to{visibility:visible}}@-moz-keyframes -amp-start{from{visibility:hidden}to{visibility:visible}}@-ms-keyframes -amp-start{from{visibility:hidden}to{visibility:visible}}@-o-keyframes -amp-start{from{visibility:hidden}to{visibility:visible}}@keyframes -amp-start{from{visibility:hidden}to{visibility:visible}}</style><noscript><style amp-boilerplate>body{-webkit-animation:none;-moz-animation:none;-ms-animation:none;animation:none}</style></noscript>
  {% comment %}
  {{ content_for_header }}
  {% endcomment %}
</head>
<body id="{{ page_title | handle }}">
    <section class="main">
      <h1 style="text-align:center;">My Blank AMP Page</h1>
      {{page.content}}
    </section>
</body>
</html>
- Navigate to your "Pages" tab on the left.
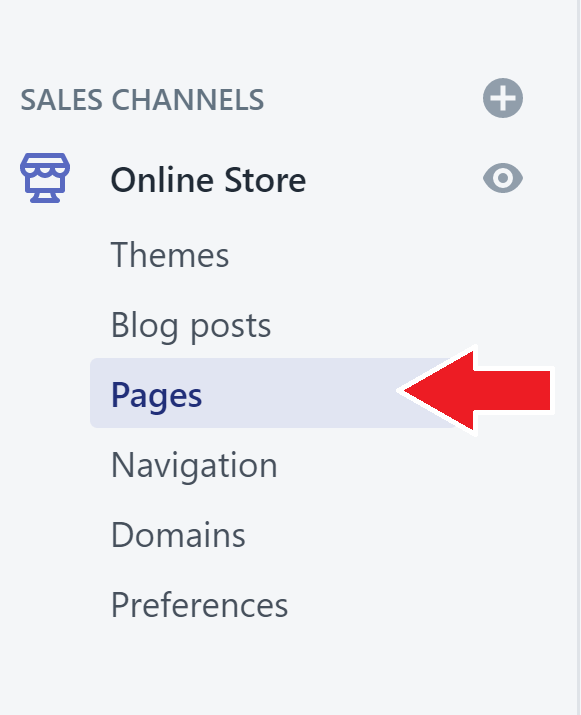
- Select "Add page".

- Create a page titled "AMP Test", with Template: "page.amp".
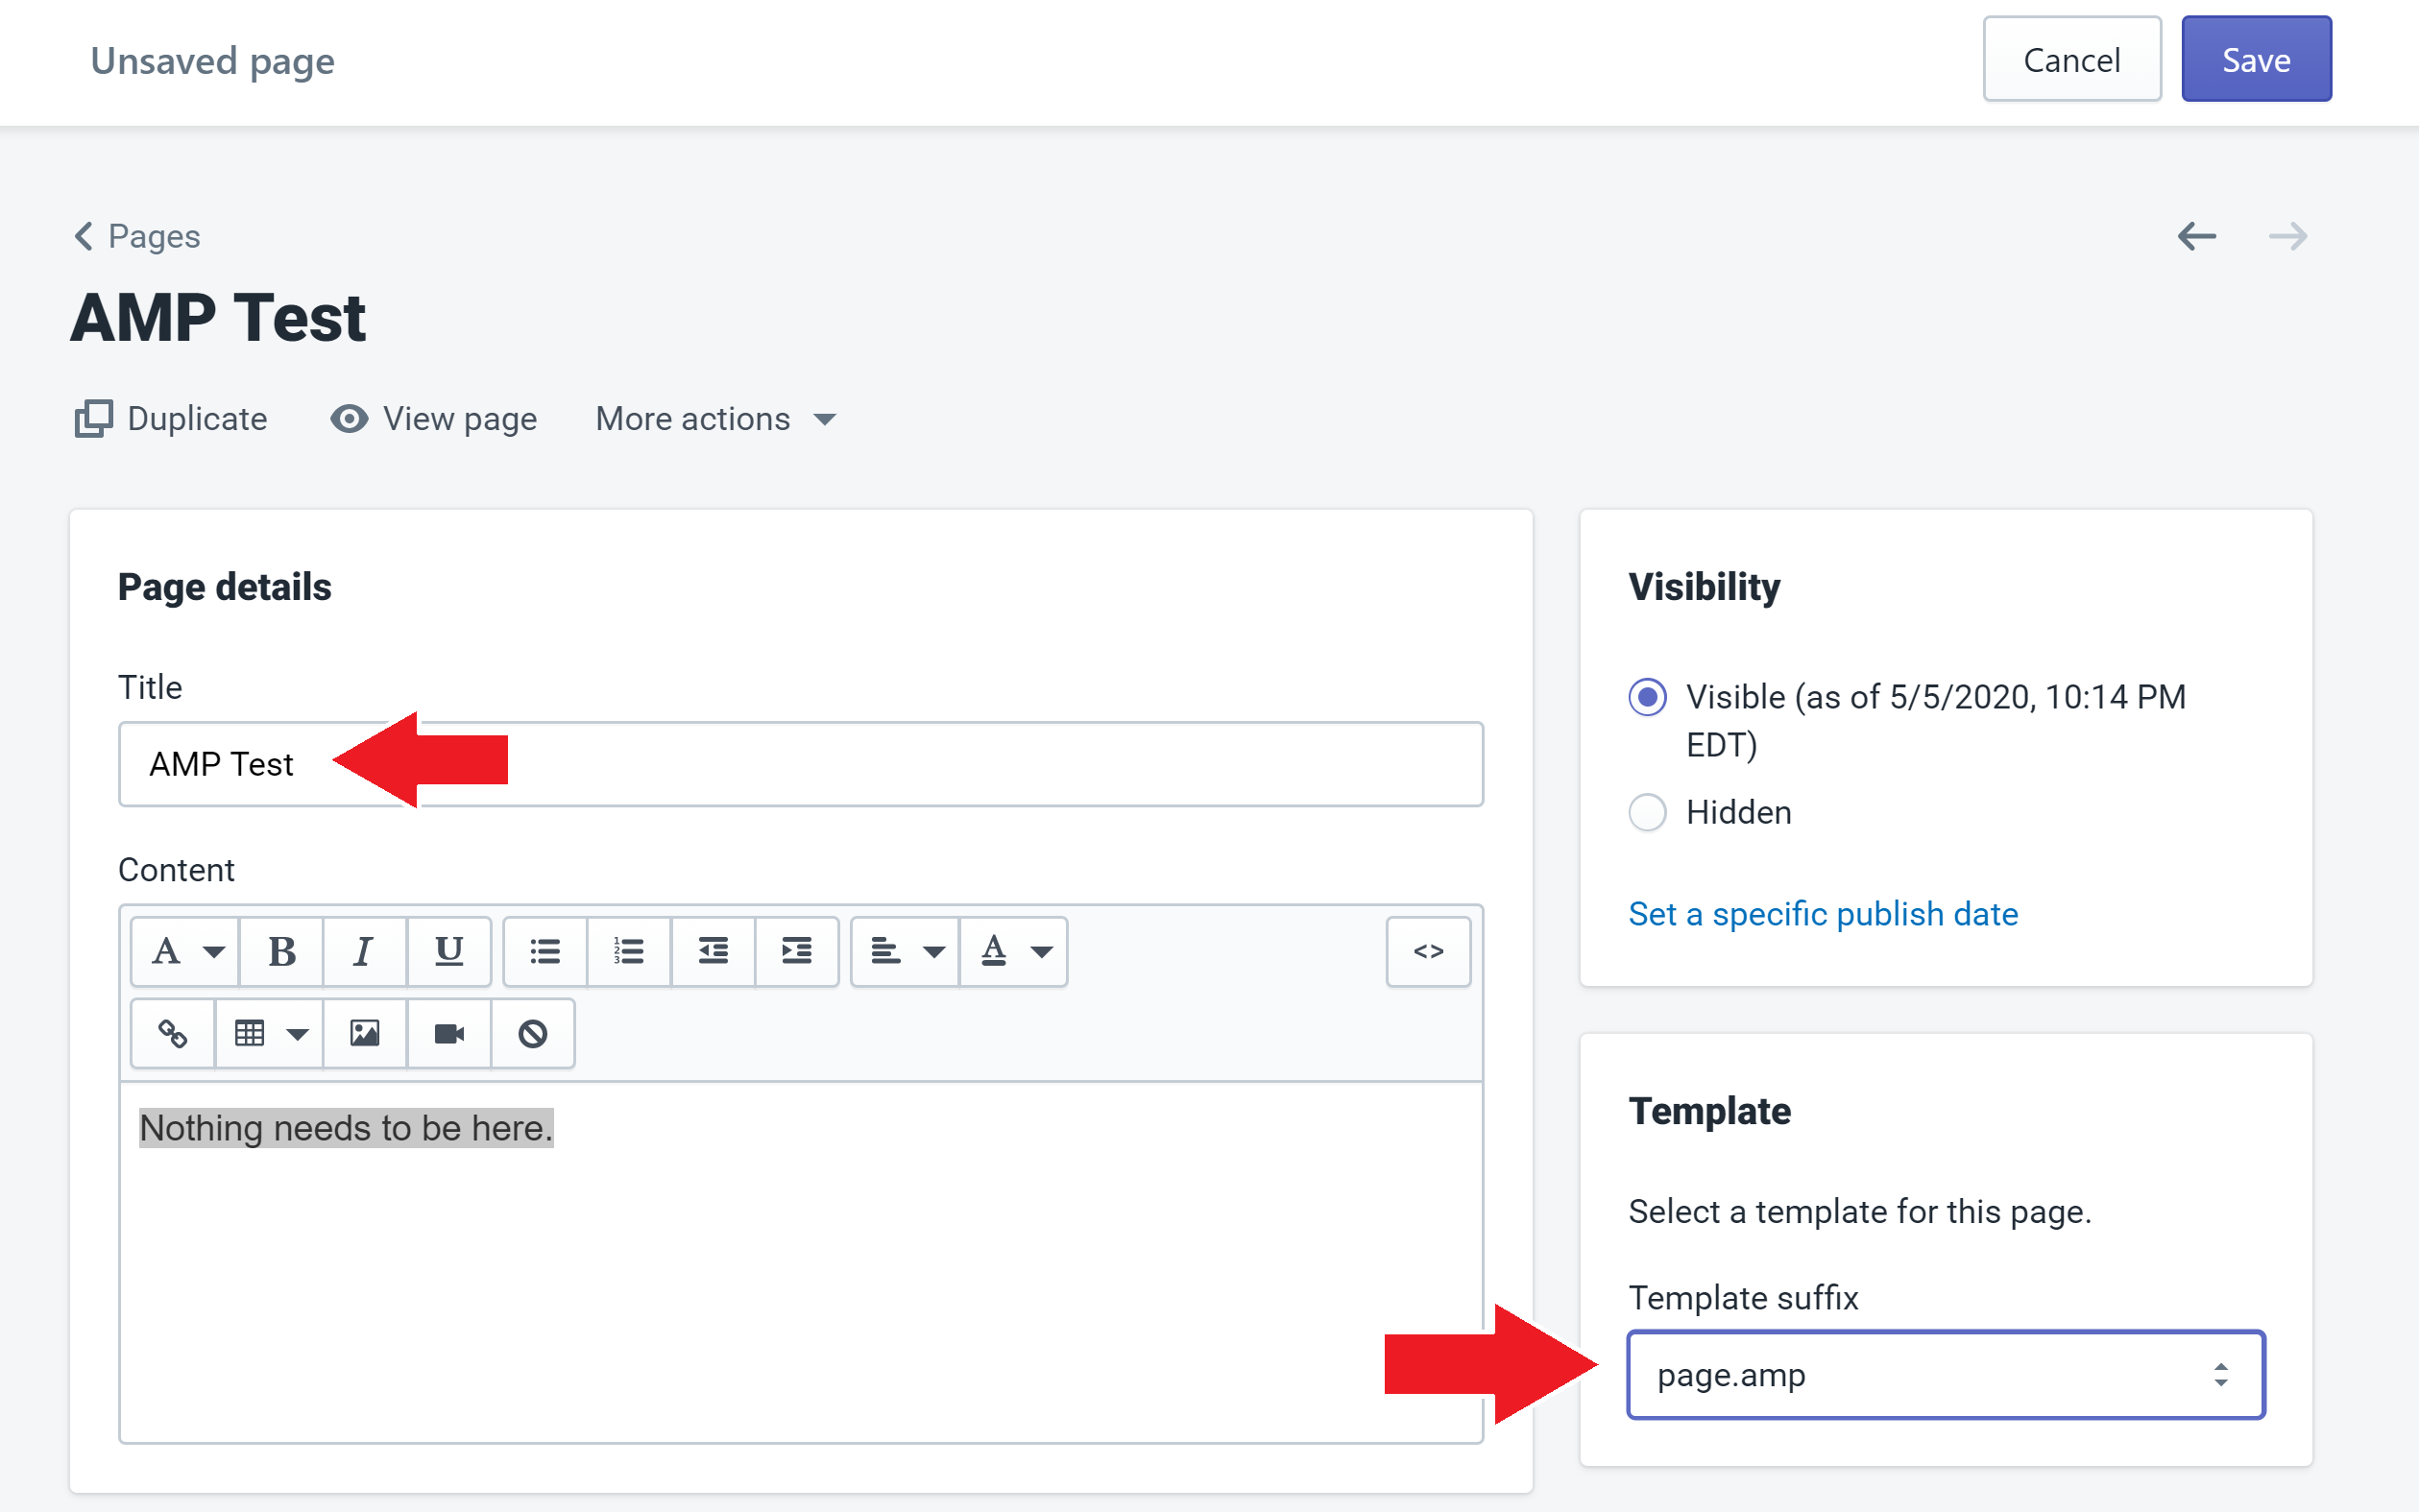
- Click "Save".
- Navigate to yoursite.com/pages/amp-test and you will be able to see the AMP page.
- Return to step 8 to edit the code and update your AMP page.
Option 2 - Creating an AMP Product template on Shopify
- Open your Shopify Themes panel.
- Click "Actions > Edit code".
- Select "Add a new layout".

- Create a layout for: theme called amp.
- Delete the entire boilerplate code in that new theme.
- Enter this code and click "Save".
{% comment %} <!doctype html> <html class="no-js" lang="{{ shop.locale }}"> <head> {{ content_for_header }} </head> </html> {% endcomment %} {{content_for_layout}} - Click "Add a new template".

- Create a new template for products called amp.
- In the products.amp.liquid file that is created, enter this code and click "Save":
{% layout 'theme.amp' %} <!doctype html> <html amp lang="{{ shop.locale }}"> <head> <script async src="https://cdn.ampproject.org/v0.js"></script> <script async custom-element="amp-sidebar" src="https://cdn.ampproject.org/v0/amp-sidebar-0.1.js"></script> <script async custom-element="amp-form" src="https://cdn.ampproject.org/v0/amp-form-0.1.js"></script> <script async custom-element="amp-analytics" src="https://cdn.ampproject.org/v0/amp-analytics-0.1.js"></script> <script async custom-element="amp-selector" src="https://cdn.ampproject.org/v0/amp-selector-0.1.js"></script> <script async custom-element="amp-list" src="https://cdn.ampproject.org/v0/amp-list-0.1.js"></script> <script async custom-element="amp-bind" src="https://cdn.ampproject.org/v0/amp-bind-0.1.js"></script> <!-- Import other AMP Extensions here --> <style amp-custom> /* Add your styles here */ </style> <style amp-boilerplate>body{-webkit-animation:-amp-start 8s steps(1,end) 0s 1 normal both;-moz-animation:-amp-start 8s steps(1,end) 0s 1 normal both;-ms-animation:-amp-start 8s steps(1,end) 0s 1 normal both;animation:-amp-start 8s steps(1,end) 0s 1 normal both}@-webkit-keyframes -amp-start{from{visibility:hidden}to{visibility:visible}}@-moz-keyframes -amp-start{from{visibility:hidden}to{visibility:visible}}@-ms-keyframes -amp-start{from{visibility:hidden}to{visibility:visible}}@-o-keyframes -amp-start{from{visibility:hidden}to{visibility:visible}}@keyframes -amp-start{from{visibility:hidden}to{visibility:visible}}</style><noscript><style amp-boilerplate>body{-webkit-animation:none;-moz-animation:none;-ms-animation:none;animation:none}</style></noscript> {% comment %} {{ content_for_header }} {% endcomment %} </head> <body id="{{ page_title | handle }}"> <section class="main"> <h1 style="text-align:center;">My Blank AMP Page</h1> {{product.title}} </section> </body> </html> - You can now use products.amp.liquid to edit the code on the AMP product template.
-
View your AMP product by navigating to any normal .product page on your site, and then adding
?view=ampto the end of the page, and hit enter. If you already see a "?" in the URL, then add&view=amp, and hit enter.
Testing AMP Product Page Functionality on Shopify
You can copy the code of an existing AMP by Shop Sheriff generated AMP page onto your Shopify store. After this, you can alter functionality of that Shopify page to help you test if there is a specific functionality that you'd like to see AMP by Shop Sheriff adopt. If it's possible for you to create it on that AMP page, then it might be possible for us to recreate it within the app, although it is not guaranteed.
Completing this will first require you to complete Option 2, above, and has a slight variation for step #9. You should first complete Option 2, above.
- Open the official AMP playground here.
- Click "Import" and type in your AMP page URL.

- Once this is imported, copy the code in its entirety.
- Complete Option 2, above, but when you get to #9, do the following:
- Type
{% layout 'theme.amp' %}followed by the exact code from the page you copied in #3 of this section. - Click "Save".
- Type
Happy coding!